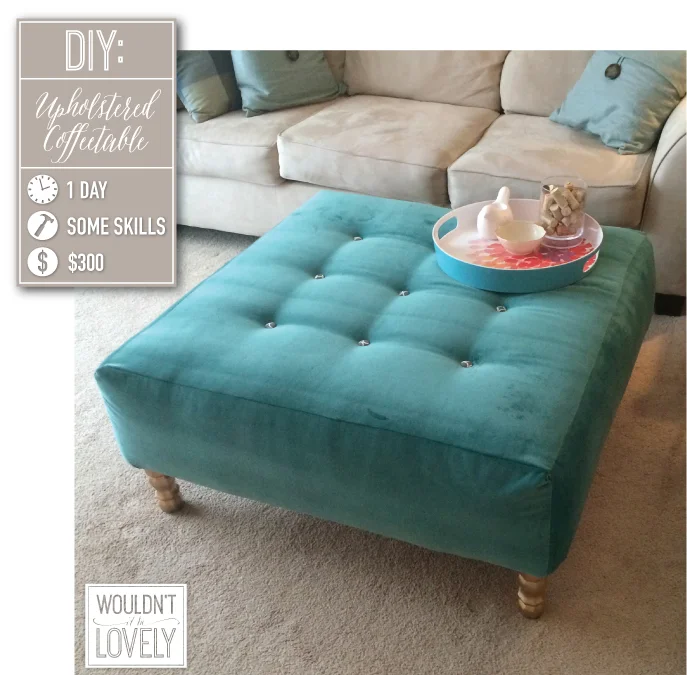
There are lots of DIY ottomans out there, usually starting with an existing piece of furniture. But when you use an existing piece furniture, like a coffee table, you are stuck with the size and proportions. The thing is, starting from scratch isn't that much harder, nor does it take that much more time! My friend, Erin, really wanted a big upholstered ottoman in her living room, and she wanted it to add some color and interest, but hadn't seen anything she liked in her $300 budget. So we took a trip to the fabric store and bought some pretty teal velvet, and then headed over to Home Depot for all our supplies. We spent almost exactly $300 for all the supplies and it took pretty much an entire day (it would have been less if I had planned a little better! We had to run out to grab more supplies because I under estimated for batting and fabric! that being said, it all went pretty smoothly! See the full DIY and directions below!
Supplies:
- 3.5 yards of fabric (one of the reasons we came in at a higher price was because we bought REALLY nice fabric!)
- 9 cute buttons, and 9 inexpensive buttons you'll never see
- Embroidery thread
- 3.5 yards of batting
- 1 king sized foam mattress cover (I bought a full and had to MacGyver it a bit, you can get them at Walmart for under $25 and it's MUCH cheaper than buying upholstery foam from the fabric store)
- 4 large L-brackets
- 4 small L-brackets
- 4 corner brackets
- 4 corner leg brackets
- 4 screw in wood legs
- 3ftx3ft 1/2in plywood
- 4 lengths of 1x12 boards cut to 2ft 11.25in, they will cut wood for you at Home Depot and Lowes, so bring your measurements all written down! (you could get a narrower board width here, but then you would need longer legs to get to the standard 18" coffee table height)
- Two 2x4s cut to 2ft 10.5in
- Nails, screws and staples
Tools:
- Electric Drill
- Hammer
- Staple gun
- Sewing Machine
- 1 Long sewing needle
Process:
- Attach four side boards with corner brackets at one end, and large L-brackets at the other
- Screw top to corner brackets
- Nail in edges of the top with small nails
- Attach the 2x4s as braces with the small L-brackets (just for extra support so people could safely sit, stand or even dance on your ottoman)
- Cut your king sized foam topper into an x-shape, the center square being 3ft x 3ft and the four "wings" measuring 3ft x 14in (see diagram) staple down the corners so the endure box is covered, the corners may look funny (see picture) but once covered in batting, you'll never feel or see it. Then pull the ends of the wings to the inside of the box and staple them down
- Repeat the same process with the batting, but leave the corners loose, once you put the fabric on top, you can reach under and smooth the corners out.
- Cut the Fabric top to a square, 38in x 38in so you have space for pinning
- Cut four more pieces of 38in x 16in
- Mark the 3ft x 3ft square on the large square piece, pin each side to the ends then sew all the "wings" to the center square
- Lay the pieces you just sewed together, good side of the fabric down so you can see the seams. Then pin each corner together so they fit tight, moving from the top corner down to the ends. Doing it this way insures that you don't sew it too tight or loose
- Sew all the corners
- Pull the case you've just created over the top of the covered box, right side out this time. smooth out all the batting and fabric so it's as tight and smooth as possible
- On the bottom inside of the box, measure out the placement of your tufting buttons and mark with a marker.
- Drill Holes
- With a Long needle, and doubled up embroidery thread go from the bottom of the box, through the hole and top, then thread button, and go back through the same hole. Thread both ends through another button. Have someone push the button in from the other side and tie the ends as tightly as possible, repeat for all the other buttons.
- Pull the bottom tight around to the inside of the box and staple it down, move from side to side, checking that you are pulling evenly so the top seams all stay strait
- Place the corner feet brackets at each corner and nail them into the wood- If you've ever tried screwing through upholstery, you'll see what I nail these, and because the weight is pushing down into the brackets, they'll stay secure, so no need to use screws here!
- Screw in your feet and you're all done! Yay for a new ottoman!


