

So as you've probably noticed, I haven't had much time lately for the DIYs around the house that I love so much. So, last weekend while grabbing some frames for a client at HomeGoods, I stumbled upon this pretty shiny red mailbox and decided it was the perfect remedy for my DIY hankering. Our original mailbox was a little sad, and just like everyone else's, and I hate blending in :) so it had to be changed. I did a little number upgrade by using these nice metal stick on numbers I found at Home Depot. They were just peel and stick, and couldn't have been easier! Then it was just a couple of screws and Voila! A happy new red mailbox.
Pretty Office Necessities

Sometimes I get the urge to splurge. Right now, my mind is on office supplies. Sometimes having pretty and functional supplies makes working easier and even a little more fun. Above are some items I'm loving.
Folding Ruler: I like these so much better than measuring tape. They are SO much prettier and easier to use. This red one is perfect.
Brass Pencil Holder: This holder gives the ideal writing instrument a little more heft, which as a designer I really appreciate. Also, brass is so very in right now.
Patterned Mouse Pad: No real functional advantage here, but it's gold and pretty, so I'll pretend it works better than my standard mouse pad.
Footed File Holder: I always like to have my most pressing and pertinent work files and mail close at hand. Then, as I read/ finish things, I'll file them away in a more permeant location. Also When this sucker fills up, I know its time to deal with things! Plus, it has paws, so yeah, it's amazing.
DIY Upholstered Ottoman
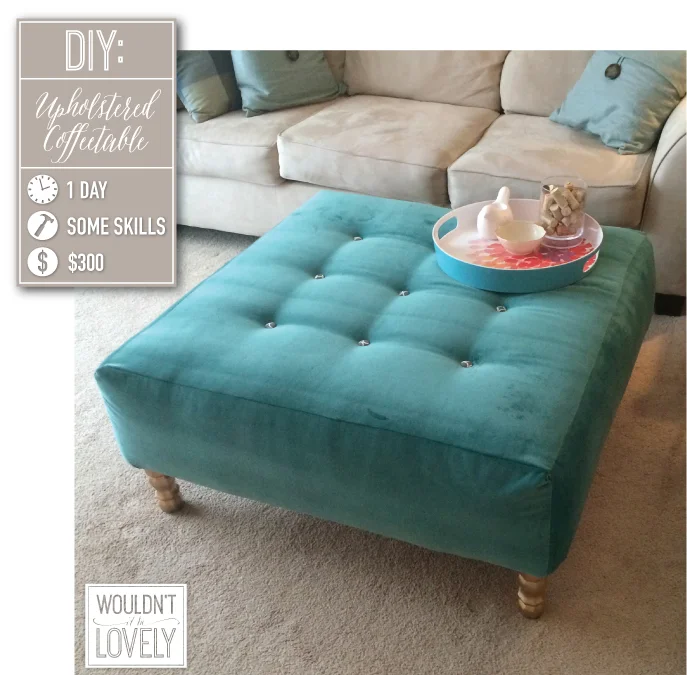
There are lots of DIY ottomans out there, usually starting with an existing piece of furniture. But when you use an existing piece furniture, like a coffee table, you are stuck with the size and proportions. The thing is, starting from scratch isn't that much harder, nor does it take that much more time! My friend, Erin, really wanted a big upholstered ottoman in her living room, and she wanted it to add some color and interest, but hadn't seen anything she liked in her $300 budget. So we took a trip to the fabric store and bought some pretty teal velvet, and then headed over to Home Depot for all our supplies. We spent almost exactly $300 for all the supplies and it took pretty much an entire day (it would have been less if I had planned a little better! We had to run out to grab more supplies because I under estimated for batting and fabric! that being said, it all went pretty smoothly! See the full DIY and directions below!

Supplies:
- 3.5 yards of fabric (one of the reasons we came in at a higher price was because we bought REALLY nice fabric!)
- 9 cute buttons, and 9 inexpensive buttons you'll never see
- Embroidery thread
- 3.5 yards of batting
- 1 king sized foam mattress cover (I bought a full and had to MacGyver it a bit, you can get them at Walmart for under $25 and it's MUCH cheaper than buying upholstery foam from the fabric store)
- 4 large L-brackets
- 4 small L-brackets
- 4 corner brackets
- 4 corner leg brackets
- 4 screw in wood legs
- 3ftx3ft 1/2in plywood
- 4 lengths of 1x12 boards cut to 2ft 11.25in, they will cut wood for you at Home Depot and Lowes, so bring your measurements all written down! (you could get a narrower board width here, but then you would need longer legs to get to the standard 18" coffee table height)
- Two 2x4s cut to 2ft 10.5in
- Nails, screws and staples
Tools:
- Electric Drill
- Hammer
- Staple gun
- Sewing Machine
- 1 Long sewing needle
Process:
- Attach four side boards with corner brackets at one end, and large L-brackets at the other
- Screw top to corner brackets
- Nail in edges of the top with small nails
- Attach the 2x4s as braces with the small L-brackets (just for extra support so people could safely sit, stand or even dance on your ottoman)
- Cut your king sized foam topper into an x-shape, the center square being 3ft x 3ft and the four "wings" measuring 3ft x 14in (see diagram) staple down the corners so the endure box is covered, the corners may look funny (see picture) but once covered in batting, you'll never feel or see it. Then pull the ends of the wings to the inside of the box and staple them down
- Repeat the same process with the batting, but leave the corners loose, once you put the fabric on top, you can reach under and smooth the corners out.
- Cut the Fabric top to a square, 38in x 38in so you have space for pinning
- Cut four more pieces of 38in x 16in
- Mark the 3ft x 3ft square on the large square piece, pin each side to the ends then sew all the "wings" to the center square
- Lay the pieces you just sewed together, good side of the fabric down so you can see the seams. Then pin each corner together so they fit tight, moving from the top corner down to the ends. Doing it this way insures that you don't sew it too tight or loose
- Sew all the corners
- Pull the case you've just created over the top of the covered box, right side out this time. smooth out all the batting and fabric so it's as tight and smooth as possible
- On the bottom inside of the box, measure out the placement of your tufting buttons and mark with a marker.
- Drill Holes
- With a Long needle, and doubled up embroidery thread go from the bottom of the box, through the hole and top, then thread button, and go back through the same hole. Thread both ends through another button. Have someone push the button in from the other side and tie the ends as tightly as possible, repeat for all the other buttons.
- Pull the bottom tight around to the inside of the box and staple it down, move from side to side, checking that you are pulling evenly so the top seams all stay strait
- Place the corner feet brackets at each corner and nail them into the wood- If you've ever tried screwing through upholstery, you'll see what I nail these, and because the weight is pushing down into the brackets, they'll stay secure, so no need to use screws here!
- Screw in your feet and you're all done! Yay for a new ottoman!
DIY Cork Bead Trivet

I saw this lovely trivet from West Elm not too long ago, and thought it was really something! Here's the thing with trivets though, they take up space in the kitchen that I just don't have to spare. I decided to do something a little different with my DIY version, I made it a string instead of a circle. As a string of cork beads, I can hang it from my utensil rack when I'm not using it, and connect the ends to make a circle when I am. It's pretty genius, I'm giving myself a pat on the back! All you'll need are 10 1.24in cork balls, 4 1in cork balls, and a length of string. The full how-to is below:

Luckily this DIY is so easy it doesn't need much more explanation after the pictures!
- Tape the end 1.5" of the string so it's easy to thread
- Drill holes in the center of all the cork balls. I used ten 1.24" balls and four 1" balls, I used two of the larger with one of the smaller in-between.
- Thread your first "bead" the follow it up with a knot in the string, this makes the whole thing more flexible at the end- think of a string of pearls.
- Once you've strung them all, tie a standard knot at one end, and a loop at the other that's large enough for the bead at the other end to fit through.
- Fini! (That's a nice french " finish" for you!)
Little Organizational Tricks

I've been super busy with wedding projects of late, so my home DIY projects have been put on hold for a bit. BUT, no matter how busy you are, there is always something you can do around the house to make it look or function better! I sometimes feel that the little things I do aren't worth blogging about. Then I realize, that the little changes and improvements I make can have an enormous impact. Whether it makes me feel more organized, or just makes day to day life a little easier.
One of the these little improvements I made recently, was putting these little cord holders on our bedside table. I read every night before I go to bed, and check emails first thing in the morning. Which means, I always need to charge my kindle and iPad, but don't want to get up to charge them in another room. Having these little suckers means that I always know exactly where the cords are, and they are all neat and tidy (instead of a jumbled heap under the bed hanging out with dog hair dust puppies)!
The other little change I made, was attaching this lovely double hook on the back of our bedroom door. I rotate pretty regularly between these three handbags, and I don't want to dig through the closet every time I make a wardrobe decision. That being said, it always felt messy, and potentially damaging to my bags, to leave them laying around willy-nilly. So, something as simple as putting a pretty hook on the back of a door makes my bags feel a little better taken care of, and easily accessible!
So do something little that makes your life easier this weekend! I promise, it'll make you feel like you've got rainbows coming out of your tush!